Welcome to our guide on using an AR-15 cleaning kit! If you’re a gun enthusiast, then keeping your firearms in top-notch condition is of utmost importance. Cleaning and maintaining your AR-15 not only enhances its longevity but also ensures that it functions at its best when you need it the most. In this step-by-step guide, we’ll take you through the process of using an AR-15 cleaning kit so that you can keep your rifle in excellent working condition. So, let’s get started!
What You’ll Need
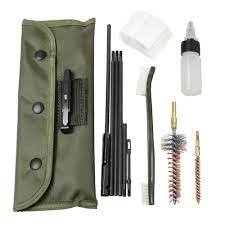
Before diving into the step-by-step instructions for using an AR-15 cleaning kit, it’s essential to make sure you have all the necessary materials. Here are some of the items you’ll need:
First and foremost, you’ll need your AR-15 rifle and a designated cleaning area with adequate ventilation. It’s also essential to have eye and ear protection as disassembling your firearm can create debris that may cause harm.
To clean your AR-15 effectively, invest in a quality cleaning kit specifically designed for this type of rifle. You can find these kits at most gun stores or online shops. The cleaning kit should include tools such as bore brushes, patch holders, solvent applicators, cotton swabs, and oils.
Don’t forget about rags or paper towels for wiping down surfaces during the process. A plastic tray or container is also handy for holding small parts while being cleaned.
Having all these necessary items prepared ahead of time will make the entire process much more manageable and efficient!
Step One: Remove the Upper Receiver
The first step in using an AR-15 cleaning kit is to remove the upper receiver from the lower receiver. This allows you to access and clean the barrel and bolt carrier group. To begin, ensure your rifle is unloaded by removing the magazine and checking the chamber.
Next, separate the two receivers by pulling out both rear takedown pins located near the base of the upper receiver. Then, carefully lift off the upper receiver assembly.
Be sure to keep track of any small parts that may come loose during this process, such as detents or springs. It’s a good idea to place them in a container so they don’t get lost.
Once you’ve removed the upper receiver, set it aside on a soft surface like a towel or mat. This will prevent scratches and damage while you work on cleaning your rifle.
It’s important to take care when removing your AR-15’s upper receiver to avoid damaging any components or losing small pieces. By following these steps carefully, you can easily move on to cleaning your rifle thoroughly with confidence!
Step Two: Clean the Barrel
Cleaning the barrel of your AR-15 is an essential step in maintaining its accuracy and reliability. Neglecting this task can lead to fouling, which can impact the performance of your rifle. Luckily, with the right tools and technique, it’s a relatively simple process.
To get started, ensure that you have a bore brush appropriate for your caliber as well as cleaning patches. You’ll also need gun oil or solvent to help break down any buildup within the barrel.
Firstly, Apply some solvent on a patch and run it through from breech to muzzle using a cleaning rod until all visible dirt build-up is removed. Then use another clean patch soaked with gun oil to lubricate thoroughly inside out by running it through several times from breech end followed by one dry patch.
It’s important not to overuse solvents when cleaning your barrel as over-cleaning may cause damage; two passes with solvent-soaked patches should suffice unless there is substantial fouling present.
Step Three: Clean the Bolt Carrier Group
The bolt carrier group (BCG) is a critical component of an AR-15 rifle. It consists of several small parts, including the bolt assembly, firing pin, and extractor. Cleaning the BCG ensures that your rifle functions correctly and reduces wear on these components.
To begin cleaning the BCG, remove it from the upper receiver by pushing out the retaining pins. Then disassemble it by removing all of its individual pieces.
Next, inspect each part for signs of damage or excessive wear. Make sure to pay special attention to areas where carbon buildup may occur, such as around the gas rings and inside the bolt carrier key.
Clean each piece thoroughly with a bore brush and solvent to remove any debris or fouling that has accumulated during use. Be sure to dry each piece before reassembling them in their proper order.
Step Four: Reassemble the Rifle
After cleaning the barrel and bolt carrier group, it’s time to put your rifle back together. Start by reattaching the bolt carrier group to the upper receiver. Place it in position and slide it forward until it clicks into place.
Next, insert the charging handle into its slot on top of the upper receiver. Align it with the bolt carrier group before pushing it forward until fully engaged.
Now, take your lower receiver and attach it to your upper receiver by inserting two pins through both receivers’ holes. Make sure that they are inserted correctly before pushing them all the way through.
Ensure that everything is securely attached before testing out your AR-15 at a range or backyard shooting area!
Conclusion
Cleaning your AR-15 is an essential task that should be done regularly to ensure the longevity and proper functioning of your firearm. By using a quality AR-15 cleaning kit and following these step-by-step instructions, you can properly clean your rifle in no time.
Remember to always follow safety guidelines when handling firearms, including unloading the magazine and chamber before beginning any maintenance or cleaning tasks. With the right tools and techniques, you can keep your AR-15 in top condition for years to come. Happy shooting!